Display Options
Customize your view type, grouping, sorting, and visible properties to match your workflow.
Overview
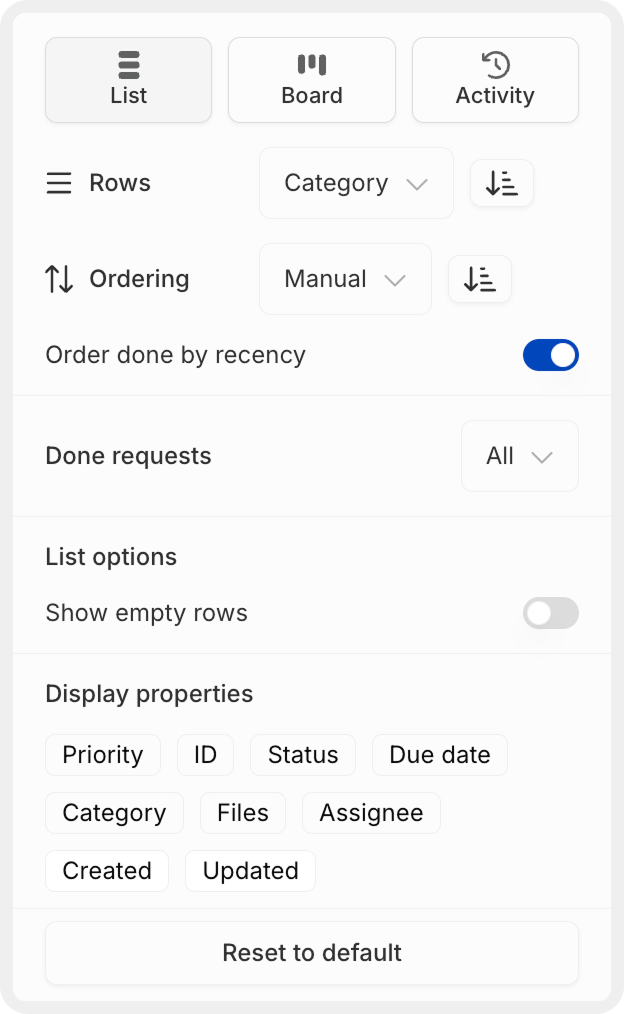
The Display Options panel allows you to customize how your requests are presented. Switch between view types, configure grouping and sorting, control which columns are visible, and adjust how completed requests appear.
Display settings are flexible and can be adjusted at any time without affecting your underlying request data.
Opening Display Options
In the board or list view of an engagement, click the Display button in the toolbar at the top of any view to open the display options panel.
View Options
Switch between different view types to match your workflow:
List
Detailed, row-based view with customizable columns for reviewing multiple requests.
Board
Kanban-style board layout for visual workflow management with drag-and-drop.
Activity
Timeline of request changes and updates for tracking engagement progress.
Your filters and search settings persist as you switch between view types, maintaining your workflow context.
Layout Configuration
Rows (Grouping)
Control how requests are grouped in List and Board views.
Available grouping options:
| Grouping | Description | Best For |
|---|---|---|
| Category | Group by audit area or project (default) | Organizing by functional area |
| Status | Group by workflow stage (Backlog, To Do, etc.) | Focusing on workflow progression |
| Priority | Group by urgency level | Prioritizing critical work |
| Assignee | Group by team member | Reviewing individual workloads |
| Due Date | Group by due date ranges | Managing deadlines |
| None | No grouping, flat list | Simple, ungrouped view |
The default grouping is by Category. Each group header shows the group name and request count (e.g., "Operating Expenses 3").
Ordering
Control the sort order of requests within each group.
Ordering options:
Manual
Custom drag-and-drop ordering that you control. Requests stay where you place them.
Alphabetical
Sort requests by title from A to Z within each group.
Priority
Sort by priority level (Urgent first, then High, Medium, Low).
Due Date
Sort by due date with earliest dates first.
Created
Sort by creation date with newest or oldest first.
Order done by recency:
Toggle this option to control where completed requests appear:
- On: Recently completed requests appear at the bottom of each group
- Off: Completed requests maintain their sorted position
Manual ordering gives you full control but requires you to drag requests into your preferred order. Other sort options automatically organize requests.
Done Requests
Control how completed requests are displayed.
Show all done requests
Display all completed requests alongside active ones (default).
Hide done requests
Hide completed requests from view to focus on active work.
Hiding done requests removes them from view but doesn't delete them. They remain in the system and can be shown again by changing this setting.
List Options
These options are specific to List view and control how the list is displayed.
Show Empty Rows
Toggle to display or hide category groups that contain no requests.
- On: Empty groups appear with a count of 0, providing a complete view of all categories
- Off: Only groups with requests are shown (cleaner view)
When to use:
- Show empty rows: When you want to see all categories, even if some are empty (useful for templates)
- Hide empty rows: When you want a focused view showing only active categories
Display Properties
Select which columns to show in List view. Available columns include:
| Column | Description | Useful For |
|---|---|---|
| Priority | Visual indicator of urgency | Identifying critical requests at a glance |
| ID | Unique numeric identifier | Reference and tracking |
| Status | Current workflow stage | Seeing request progress |
| Due date | Target completion date | Managing deadlines |
| Category | Audit area assignment | Understanding functional organization |
| Files | Number of attached files | Seeing which requests have documentation |
| Assignee | Team member assigned | Tracking responsibility |
| Created | Date request was created | Understanding request age |
| Updated | Last modification date | Seeing recent activity |
Select only the columns you need for your current task. Too many columns can make the list harder to scan.
How to manage columns:
Open display properties
Scroll to the Display properties section in the Display Options panel.
Select columns
Click on column names to toggle them on or off. Selected columns appear with a checkmark or highlight.
View changes
The List view immediately updates to show or hide the selected columns.
Reset to Default
If you've customized your display settings extensively and want to start fresh:
- Scroll to the bottom of the Display Options panel
- Click Reset to default
- All display settings return to their original defaults
Resetting to default affects all display settings including view type, grouping, ordering, and visible columns. This action cannot be undone.
Display Tips
Common Display Configurations
Here are some common display setups for different workflows:
| Workflow | Recommended Settings |
|---|---|
| Daily work session | List view, Group by Status, Hide done requests, Show Priority + Due date columns |
| Team review meeting | List view, Group by Assignee, Show all done requests, Show Status + Due date columns |
| Deadline management | List view, Group by Due Date, Order by Priority, Show Priority + Assignee columns |
| Category-focused audit | List view, Group by Category, Manual ordering, Show Status + Files columns |
| Visual workflow management | Board view, Group by Status, Order by Priority |
Display settings are per-engagement and don't affect other engagements or other team members' views. Experiment freely to find what works best for you.
Display Settings Persistence
During your session:
- Display settings persist as you navigate within an engagement
- Settings remain active when switching between requests
- Search and filter results maintain the current display configuration
When switching views:
- Grouping, ordering, and column settings persist across view types where applicable
- Board view inherits grouping from List view settings
When closing the engagement:
- Display settings reset to defaults when you close and reopen the engagement
- This ensures a consistent starting point each time
If you find yourself repeatedly applying the same display settings, consider using them as your standard workflow and apply them at the start of each session.
How is this guide?